Embarking on a hiking adventure promises breathtaking views and invigorating exercise, but a poorly packed bag can quickly turn a scenic trek into a grueling ordeal. Knowing how to pack a hiking bag properly is crucial for comfort, safety, and overall enjoyment of your outdoor experience. A well-organized pack distributes weight evenly, prevents back strain, and ensures that essential gear is readily accessible when you need it most. This guide will walk you through the steps to master how to pack a hiking bag properly, transforming you from a novice packer to a seasoned trail blazer.
Understanding Your Hiking Bag
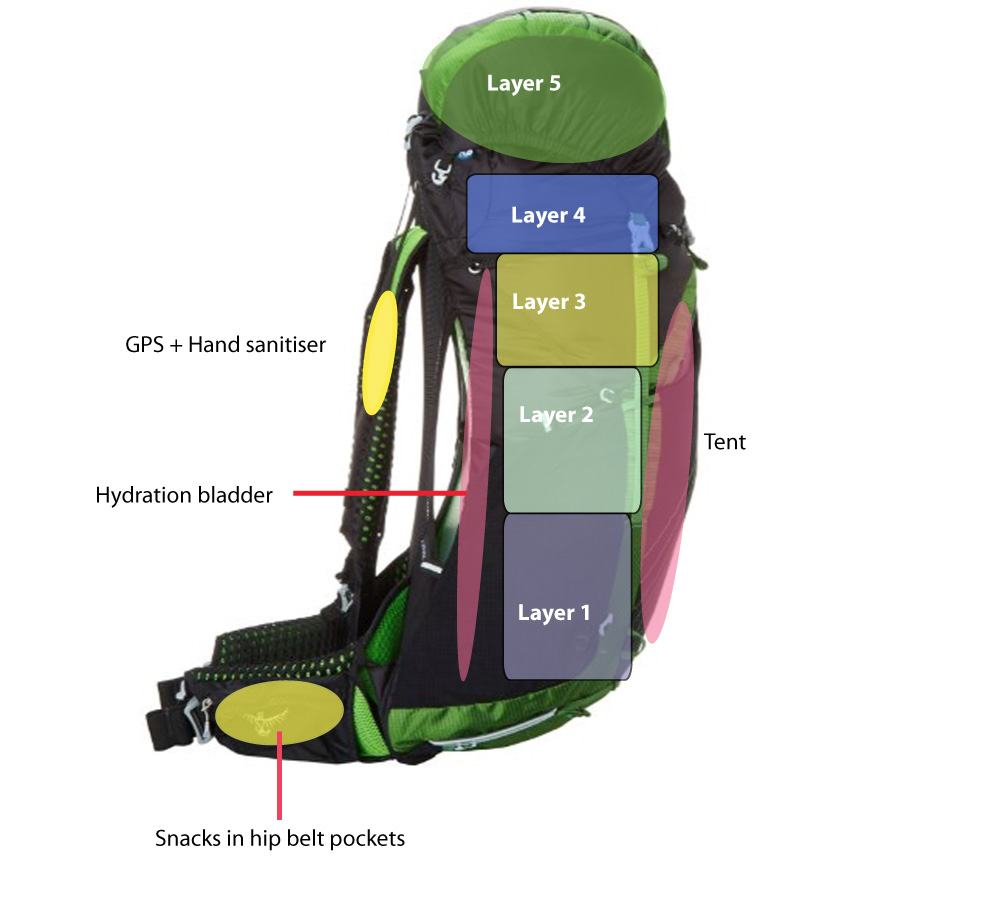
Before you even think about what to pack, familiarize yourself with the anatomy of your hiking bag. Most bags feature:
Main Compartment: The largest space, ideal for bulky items.
Top Lid/Brain: A smaller compartment for frequently used items.
Side Pockets: Useful for water bottles, snacks, or maps.
Hip Belt Pockets: Perfect for small essentials like a phone or energy gels.
Sleeping Bag Compartment (if applicable): A dedicated space at the bottom for your sleeping bag.
The Weight Distribution Principle
The key to a comfortable hike is proper weight distribution. The heaviest items should be placed closest to your back and centered in the pack. This keeps your center of gravity stable and minimizes strain.
Heaviest Items (e.g., water reservoir, food): Center of the pack, close to your back.
Medium-Weight Items (e.g., cooking gear, extra clothing): Around the heaviest items.
Lightest Items (e.g., sleeping bag, spare layers): Bottom and top of the pack.
Step-by-Step Packing Guide
1. Empty Your Bag: Start with a clean slate to assess what you’re packing.
2. Gather Your Gear: Lay out all your items to ensure you have everything you need.
3. Bottom Layer: Place your sleeping bag in the bottom compartment (if available) or at the very bottom of the main compartment.
4. Core Layer: Pack the heaviest items close to your back and centered.
5. Top Layer: Place lighter items like extra clothing, a rain jacket, or a first-aid kit on top.
6. Side Pockets: Store water bottles, snacks, and maps for easy access.
7. Top Lid/Brain: Keep essentials like sunscreen, insect repellent, and a headlamp in the top lid.
8. Hip Belt Pockets: Store your phone, energy gels, or other small items you need readily available.
9. External Attachment Points: Use these for items like trekking poles or a sleeping pad.
Tips for Efficient Packing
Roll Your Clothes: Rolling clothes saves space and minimizes wrinkles.
Use Stuff Sacks: Stuff sacks help organize your gear and compress items.
Compress Bulky Items: Use compression straps to reduce the volume of your pack.
Balance the Load: Ensure the weight is evenly distributed on both sides of the pack.
FAQ: Packing Your Hiking Bag
- Q: What if my bag doesn’t have a sleeping bag compartment?
- A: Place your sleeping bag at the bottom of the main compartment, ensuring it’s well-protected from moisture.
- Q: How tight should the straps be?
- A: The straps should be snug but not too tight. You should be able to breathe comfortably and move freely.
- Q: What if I’m hiking with a partner?
- A: Divide the weight of shared items (e.g., tent, stove) evenly between your packs.
Comparative Table: Packing Strategies
| Strategy | Pros | Cons |
|---|---|---|
| Rolling Clothes | Saves space, reduces wrinkles | Can be time-consuming |
| Using Stuff Sacks | Organizes gear, compresses items | Adds extra weight |
| Compression Straps | Reduces pack volume | Can make it harder to access items |
Ultimately, mastering the art of packing a hiking bag is a skill honed through practice. Experiment with different packing techniques and find what works best for you. Remember, a well-packed bag is your best companion on the trail, ensuring a comfortable and enjoyable hiking experience. Now that you know how to pack a hiking bag properly, get out there and explore!
Fine-Tuning Your Pack for the Trail
Once your bag is packed, don’t just assume it’s perfect. Take some time to fine-tune the fit and balance before hitting the trail. Walk around with the loaded pack, paying attention to how it feels on your back and shoulders.
- Adjust the Straps: Ensure the shoulder straps are comfortably snug, distributing the weight evenly. The hip belt should bear the majority of the load, sitting comfortably on your hips.
- Check for Hot Spots: Pay attention to any areas where the pack rubs or causes discomfort. Adjust the straps or reposition items within the pack to eliminate these “hot spots.”
- Practice Accessing Gear: Make sure you can easily reach essential items like water, snacks, and your first-aid kit without having to unpack the entire bag.
Dealing with Overpacking
It’s tempting to bring everything “just in case,” but overpacking can lead to fatigue and discomfort. Be honest with yourself about what you truly need and leave unnecessary items behind.
- Weigh Your Pack: Before you leave, weigh your pack to ensure it’s within a reasonable range for your fitness level and the length of your hike. A general guideline is that your pack should weigh no more than 20% of your body weight.
- Re-evaluate Your Gear: Go through your gear list and identify any items that you can eliminate or replace with lighter alternatives.
- Share the Load: If you’re hiking with a group, consider sharing the weight of communal items like a tent or cooking stove.
Advanced Packing Techniques
For experienced hikers tackling longer or more challenging trips, advanced packing techniques can further optimize comfort and efficiency.
- Using a Pack Liner: A pack liner is a waterproof bag that protects your gear from rain and moisture. It’s especially useful for multi-day hikes in unpredictable weather.
- External Gear Loops: Utilize external gear loops to attach items like trekking poles, ice axes, or sleeping pads. Ensure these items are securely fastened and don’t interfere with your movement.
- Dynamic Packing: Adjust your pack’s contents throughout the hike as you consume food and water. Redistribute weight to maintain balance and comfort.
The Importance of a Well-Maintained Pack
A well-maintained hiking bag will last longer and perform better;
- Regular Cleaning: Clean your pack after each hike to remove dirt, sweat, and debris.
- Inspect for Damage: Check for tears, broken zippers, or worn straps. Repair any damage promptly to prevent it from worsening.
- Proper Storage: Store your pack in a cool, dry place when not in use.
Beyond the Basics: Personalizing Your Pack
Ultimately, the best way to pack a hiking bag is the way that works best for you. Experiment with different techniques, adapt them to your specific needs, and personalize your pack to suit your individual preferences.
Remember, a well-packed bag is an extension of yourself on the trail, providing you with the comfort, support, and resources you need to conquer any adventure. With practice and attention to detail, you’ll become a master of pack organization, ready to explore the world with confidence and ease. Now that you’ve learned the nuances of how to pack a hiking bag properly, your next adventure awaits!
