A leaky or damaged U-joint under your kitchen sink can be a real headache, causing unpleasant odors, potential water damage, and frustration․ Fortunately, replacing a U-joint is a relatively straightforward DIY project that can save you money on plumbing costs․ This guide provides a step-by-step approach to safely and effectively replace your kitchen sink U-joint, ensuring a leak-free and functional plumbing system․ By following these instructions, you can tackle this common household repair with confidence and restore your kitchen sink to its proper working order․
Understanding the Kitchen Sink U-Joint
The U-joint, also known as a P-trap, is a curved section of pipe located beneath your kitchen sink․ Its primary function is to trap debris and prevent sewer gases from entering your home․ Over time, the U-joint can become clogged, corroded, or damaged, leading to leaks and unpleasant smells․ Recognizing the signs of a failing U-joint is crucial for timely replacement․
Signs of a Failing U-Joint
- Water leaks under the sink
- Unpleasant sewer odors emanating from the drain
- Slow draining water
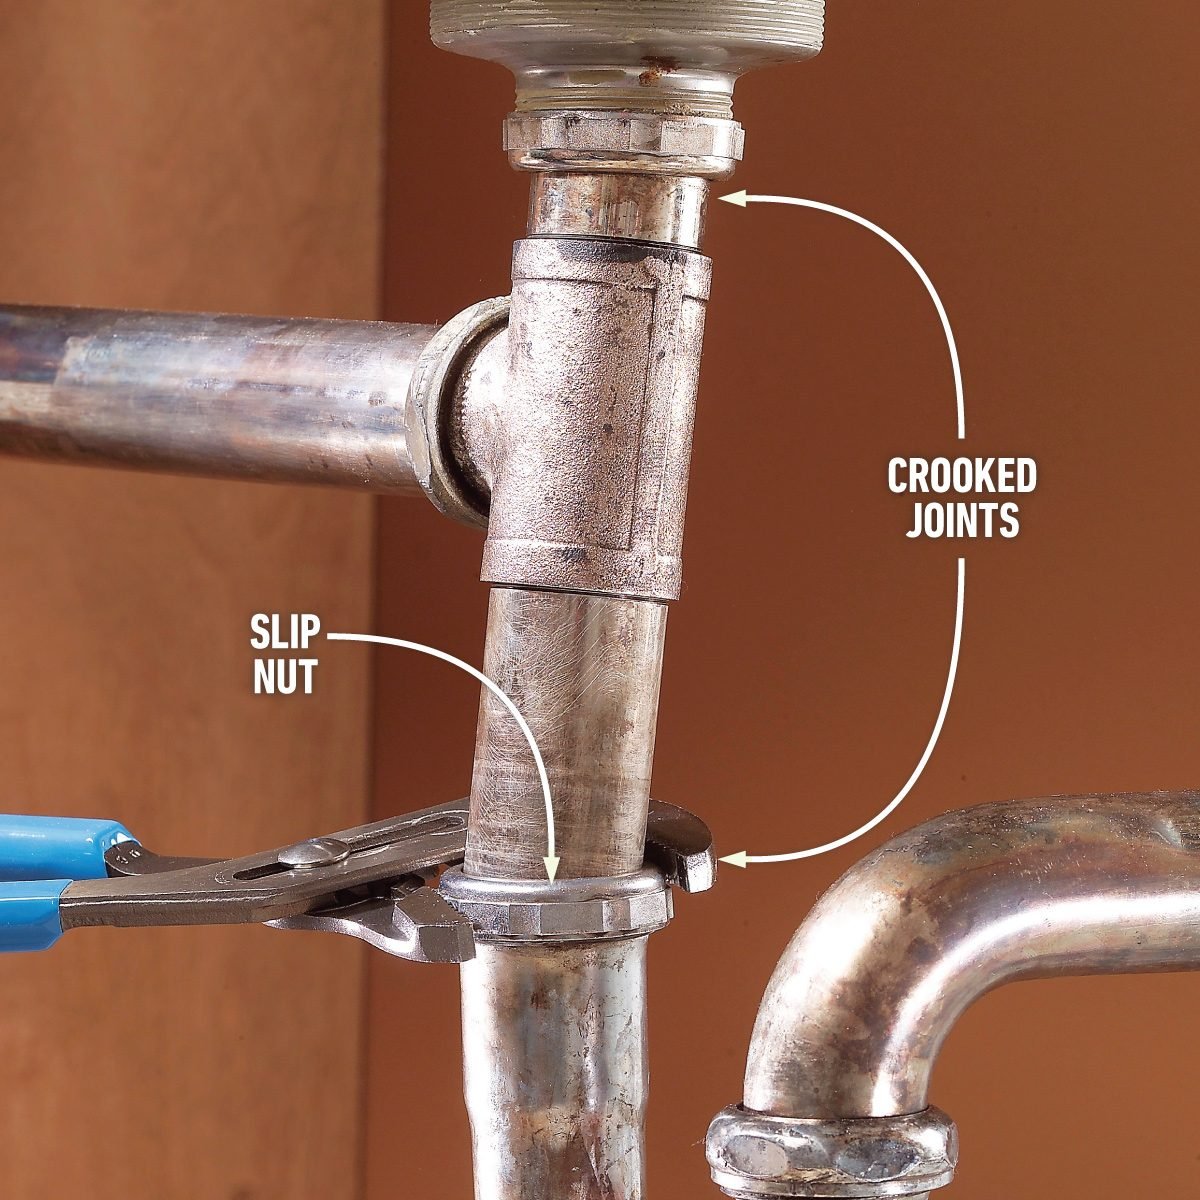
- Visible corrosion or damage to the U-joint
Tools and Materials Needed
Before you begin, gather the necessary tools and materials to ensure a smooth and efficient replacement process․ Having everything on hand will minimize interruptions and prevent unnecessary trips to the hardware store․
- New U-joint (P-trap) kit
- Adjustable pliers (or channel-lock pliers)
- Bucket or container
- Old towels or rags
- Safety glasses
- Gloves
- Optional: Plumber’s putty
Step-by-Step Replacement Guide
Follow these steps carefully to replace your kitchen sink U-joint successfully․ Remember to prioritize safety and take your time to avoid mistakes․
- Prepare the Area: Place a bucket or container under the U-joint to catch any water that may spill during the removal process․ Spread old towels or rags around the area to protect the surrounding surfaces․
- Loosen the Connections: Using adjustable pliers, carefully loosen the slip nuts that connect the U-joint to the drain pipes․ Be patient and avoid over-tightening, as the plastic nuts can be easily damaged․
- Remove the Old U-Joint: Once the slip nuts are loose, gently detach the U-joint from the drain pipes․ Carefully pour any remaining water into the bucket․
- Clean the Drain Pipes: Inspect the drain pipes for any debris or corrosion․ Clean them thoroughly with a rag or brush to ensure a proper seal with the new U-joint․
- Assemble the New U-Joint: Follow the instructions provided with your new U-joint kit to assemble the components․ Apply plumber’s putty to the threads of the connections for a watertight seal (optional)․
- Install the New U-Joint: Carefully align the new U-joint with the drain pipes and tighten the slip nuts by hand․ Then, use adjustable pliers to give them a final snug tightening․ Avoid over-tightening․
- Test for Leaks: Run water into the sink and check for any leaks around the connections․ If you detect any leaks, tighten the slip nuts slightly until the leak stops․
Tips for a Successful Replacement
Here are some additional tips to help you complete the U-joint replacement with ease:
- Take pictures of the old U-joint before disassembly․ This can be helpful when assembling the new one․
- If the slip nuts are difficult to loosen, try applying a penetrating oil lubricant․
- When tightening the slip nuts, alternate between the nuts to ensure an even seal․
- If you are unsure about any step, consult a professional plumber․
Troubleshooting Common Issues
Sometimes, even with careful planning, problems can arise during the replacement process․ Here are some common issues and how to address them:
- Leaking Connections: Ensure the slip nuts are properly tightened․ Check for debris or damage to the drain pipes․ Consider using plumber’s putty for a better seal․
- Difficult Slip Nuts: Apply penetrating oil lubricant and allow it to sit for a few minutes before attempting to loosen the nuts․
- Incorrect U-Joint Size: Double-check the size of the new U-joint before installation․ If it’s too small or too large, return it for the correct size․
FAQ (Frequently Asked Questions)
Q: How often should I replace my kitchen sink U-joint?
A: A U-joint typically lasts for many years, but it should be replaced if it shows signs of damage, corrosion, or leaks․
Q: Can I use PVC glue to seal the connections?
A: No, PVC glue is not recommended for U-joint connections, as it can make future repairs difficult․ Use the slip nuts provided with the U-joint kit․
Q: What should I do if I can’t loosen the slip nuts?
A: Apply penetrating oil lubricant and allow it to sit for a few minutes․ If the nuts are still stuck, consider calling a professional plumber․
Q: Is it safe to pour drain cleaner down the sink to unclog a U-joint?
A: While drain cleaner can sometimes help with minor clogs, it’s often better to physically remove the clog by disassembling the U-joint․ Harsh chemicals can damage pipes over time․
Q: How do I dispose of the old U-joint?
A: Check with your local waste management guidelines for proper disposal of plastic plumbing components․
Replacing a kitchen sink U-joint is a manageable DIY project that can save you money and prevent further plumbing issues․ By following these steps and tips, you can confidently tackle this common household repair․ Remember to prioritize safety, take your time, and don’t hesitate to consult a professional if you encounter any difficulties․ A properly functioning U-joint is essential for a healthy and hygienic kitchen, so regular maintenance and timely replacement are key․
With a little preparation and the right tools, you can successfully replace your kitchen sink U-joint and enjoy a leak-free and odor-free kitchen sink for years to come․ Good luck!
The U-joint, also known as a P-trap, is a crucial component located beneath your kitchen sink․ Its primary function is to trap debris and prevent sewer gases from entering your home․ Over time, the U-joint can become clogged, corroded, or damaged, leading to leaks and unpleasant smells․ Recognizing the signs of a failing U-joint is crucial for timely replacement․
- Water leaks under the sink
- Unpleasant sewer odors emanating from the drain
- Slow draining water
- Visible corrosion or damage to the U-joint
Before you begin, gather the necessary tools and materials to ensure a smooth and efficient replacement process․ Having everything on hand will minimize interruptions and prevent unnecessary trips to the hardware store․
- New U-joint (P-trap) kit
- Adjustable pliers (or channel-lock pliers)
- Bucket or container
- Old towels or rags
- Safety glasses
- Gloves
- Optional: Plumber’s putty
Follow these steps carefully to replace your kitchen sink U-joint successfully․ Remember to prioritize safety and take your time to avoid mistakes․
- Prepare the Area: Place a bucket or container under the U-joint to catch any water that may spill during the removal process․ Spread old towels or rags around the area to protect the surrounding surfaces․
- Loosen the Connections: Using adjustable pliers, carefully loosen the slip nuts that connect the U-joint to the drain pipes․ Be patient and avoid over-tightening, as the plastic nuts can be easily damaged․
- Remove the Old U-Joint: Once the slip nuts are loose, gently detach the U-joint from the drain pipes․ Carefully pour any remaining water into the bucket․
- Clean the Drain Pipes: Inspect the drain pipes for any debris or corrosion․ Clean them thoroughly with a rag or brush to ensure a proper seal with the new U-joint․
- Assemble the New U-Joint: Follow the instructions provided with your new U-joint kit to assemble the components․ Apply plumber’s putty to the threads of the connections for a watertight seal (optional)․
- Install the New U-Joint: Carefully align the new U-joint with the drain pipes and tighten the slip nuts by hand․ Then, use adjustable pliers to give them a final snug tightening․ Avoid over-tightening․
- Test for Leaks: Run water into the sink and check for any leaks around the connections․ If you detect any leaks, tighten the slip nuts slightly until the leak stops․
Here are some additional tips to help you complete the U-joint replacement with ease:
- Take pictures of the old U-joint before disassembly․ This can be helpful when assembling the new one․
- If the slip nuts are difficult to loosen, try applying a penetrating oil lubricant․
- When tightening the slip nuts, alternate between the nuts to ensure an even seal․
- If you are unsure about any step, consult a professional plumber․
Sometimes, even with careful planning, problems can arise during the replacement process․ Here are some common issues and how to address them:
- Leaking Connections: Ensure the slip nuts are properly tightened․ Check for debris or damage to the drain pipes․ Consider using plumber’s putty for a better seal․
- Difficult Slip Nuts: Apply penetrating oil lubricant and allow it to sit for a few minutes before attempting to loosen the nuts․
- Incorrect U-Joint Size: Double-check the size of the new U-joint before installation․ If it’s too small or too large, return it for the correct size․
A: A U-joint typically lasts for many years, but it should be replaced if it shows signs of damage, corrosion, or leaks․
A: No, PVC glue is not recommended for U-joint connections, as it can make future repairs difficult․ Use the slip nuts provided with the U-joint kit․
A: Apply penetrating oil lubricant and allow it to sit for a few minutes․ If the nuts are still stuck, consider calling a professional plumber․
A: While drain cleaner can sometimes help with minor clogs, it’s often better to physically remove the clog by disassembling the U-joint․ Harsh chemicals can damage pipes over time․
A: Check with your local waste management guidelines for proper disposal of plastic plumbing components․
Replacing a kitchen sink U-joint is a manageable DIY project that can save you money and prevent further plumbing issues․ By following these steps and tips, you can confidently tackle this common household repair․ Remember to prioritize safety, take your time, and don’t hesitate to consult a professional if you encounter any difficulties․ A properly functioning U-joint is essential for a healthy and hygienic kitchen, so regular maintenance and timely replacement are key․
With a little preparation and the right tools, you can successfully replace your kitchen sink U-joint and enjoy a leak-free and odor-free kitchen sink for years to come․ Good luck!
Understanding Different Types of U-Joints
While the basic function remains the same, U-joints come in different materials and slight variations in design․ Knowing these differences can help you choose the right replacement for your needs․
Materials
- PVC (Polyvinyl Chloride): This is the most common type, known for its affordability and resistance to corrosion․ It’s suitable for most residential applications․
- ABS (Acrylonitrile Butadiene Styrene): Similar to PVC, ABS is another plastic option․ It’s generally more durable than PVC but can be slightly more expensive․
- Metal (Brass or Chrome): Metal U-joints are often used for exposed plumbing or in situations where a more durable and aesthetically pleasing option is desired․ They are more expensive and can be susceptible to corrosion over time․
Design Variations
- Standard U-Joint: The most basic design, consisting of a U-shaped bend with slip nuts for connection․
- Adjustable U-Joint: Features telescoping sections that allow for greater flexibility in installation, especially when dealing with misaligned pipes․
- Deep Seal U-Joint: Has a deeper U-shaped bend, providing a larger water seal and potentially better odor protection․
Extending the Life of Your New U-Joint
Once you’ve successfully replaced your U-joint, there are several things you can do to help it last longer and prevent future problems․
Preventative Measures
- Avoid Pouring Grease Down the Drain: Grease solidifies as it cools and can clog the U-joint and drain pipes․ Dispose of grease properly in a container․
- Use a Sink Strainer: A strainer will catch food particles and other debris, preventing them from entering the U-joint and causing clogs․
- Flush with Hot Water Regularly: Periodically flushing your drain with hot water can help dissolve grease and prevent buildup․
- Clean with Baking Soda and Vinegar: Pour a cup of baking soda down the drain, followed by a cup of vinegar․ Let it fizz for 30 minutes, then flush with hot water․ This natural cleaning solution can help keep your drain clean and odor-free․
When to Call a Professional Plumber
While replacing a U-joint is often a DIY-friendly task, there are situations where it’s best to call a professional plumber․ These include:
- Extensive Plumbing Damage: If you notice significant corrosion, leaks, or damage to other plumbing components, a plumber can assess the situation and provide comprehensive repairs․
- Difficulty Loosening Connections: If you’re unable to loosen the slip nuts, even with penetrating oil lubricant, a plumber has specialized tools and experience to handle stubborn connections․
- Recurring Clogs: If you experience frequent clogs despite regular cleaning, there may be a more serious underlying issue that requires professional diagnosis and repair․
- Uncertainty or Lack of Confidence: If you’re uncomfortable performing the replacement yourself or unsure about any aspect of the process, it’s always best to err on the side of caution and call a plumber․
By understanding the different types of U-joints, taking preventative measures, and knowing when to seek professional help, you can ensure a properly functioning and long-lasting kitchen sink drain system․ Don’t hesitate to contact a qualified plumber if you encounter any challenges or have concerns about your plumbing․
